
This guide walks you through finding conversion opportunities, building the bidding controls and Strategic Objectives, launching AMC-supported keyword campaigns at scale, and protecting their budgets with portfolios.
Before You Begin
You’ll need:
- an AMC audience already created and activated;
- the ASIN(s) you want to advertise;
- an initial base bid and AMC audience adjustment you want to test;
- access to SQP / Keyword Ranking data;
- a plan for how you want to group the resulting campaigns by portfolio.
1. Find the Conversion Opportunities You Want to Target
Find Your Conversion Edge
When a listing converts better than the market for a particular search term, that search term may be a stronger candidate for additional ranking pressure. Conversion Delta shows whether your product converts at a higher or lower rate than the market for the same search term.
You’ll need both your brand conversion rate and the market conversion rate.
Brand CVR = 𝐴𝑆𝐼𝑁 𝐶𝑜𝑢𝑛𝑡 (𝑃𝑢𝑟𝑐ℎ𝑎𝑠𝑒𝑠) × 100
𝐴𝑆𝐼𝑁 𝐶𝑜𝑢𝑛𝑡 (𝐶𝑙𝑖𝑐𝑘𝑠)
Market CVR = Total 𝐶𝑜𝑢𝑛𝑡 (𝑃𝑢𝑟𝑐ℎ𝑎𝑠𝑒𝑠) × 100
Total 𝐶𝑜𝑢𝑛𝑡 (𝐶𝑙𝑖𝑐𝑘𝑠)
To calculate your conversion delta:
Conversion Delta =Brand CVR - Market CVR
Example
Market: 1,000 clicks → 100 purchases = 10% Market CVR
Your ASIN: 100 clicks → 15 purchases = 15% Brand CVR
Conversion Delta = 15% − 10% = +5 percentage points
|
Tip: The stronger the positive Conversion Delta, the more interesting that search term becomes as a candidate for additional ranking pressure. |
Note: There isn’t a universal Conversion Delta threshold that automatically means you should increase spend. Use it as a signal to investigate where your product already has an edge, alongside the rest of your campaign context.
Using Amazon Tools
- Log in to your Amazon Seller Central account.
- From the main menu, hover over Brands and select Brand Analytics.
- Click on Search Analytics and choose Search Query Performance.
- Select ASIN View, choose the ASIN you want to evaluate, then select your timeframe (weekly, monthly, or quarterly).
- Click Generate Download to export the data as a spreadsheet for deeper analysis.
- Open the downloaded SQP spreadsheet and locate these four columns:
a. Clicks: Total Count
b. Clicks: ASIN Count
c. Purchases: Total Count
d. Purchases: ASIN Count

- Add three new columns to your spreadsheet:
a. Market CVR
b. Brand CVR
c. Conversion Delta - For each search term, calculate:
a. Market CVR = Purchases: Total Count ÷ Clicks: Total Count × 100
b. Brand CVR = Purchases: ASIN Count ÷ Clicks: ASIN Count × 100
c. Conversion Delta = Brand CVR − Market CVR - Filter for search terms with a positive Conversion Delta.
These are the terms where your ASIN converted better than the market during the selected period. Use them as candidates for further review rather than automatically increasing spend.
With Scale Insights
Before you begin: Make sure the ASIN and keywords you want to evaluate are already being tracked in Keyword Ranking.
Unlike the manual workflow, Scale Insights calculates Brand CVR, Market CVR and Conversion Delta automatically.
- From your Scale Insights account, navigate to Keyword Ranking.
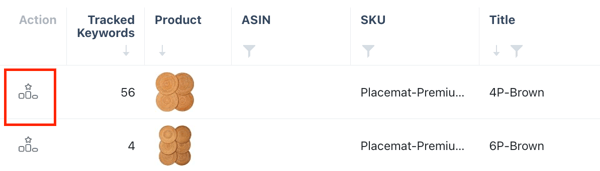
- For the ASIN to track, click on the Ranking icon.
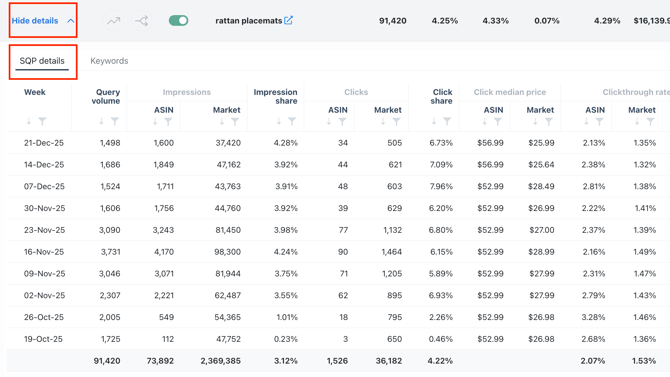
- For the ASIN and keyword you wish to track, navigate to Details > SQP details.
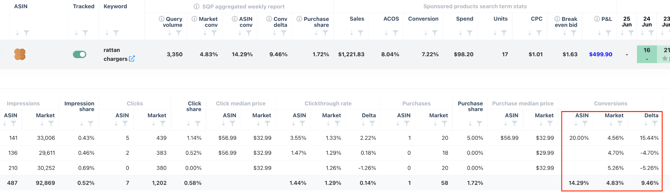
- Scroll right to the Conversions section and you should now see Brand CVR, Market CVR, and Conversion Delta for the selected keyword.
- Repeat this for the search terms you want to evaluate and note the ones with a positive Conversion Delta.
By the end of this step, you should have a shortlist of keywords you want to test with AMC. Before launching those campaigns, set up the bidding controls you want them to operate under.
2. Create the Rules That Will Control Your Bids
Find Your Lowest Viable Bid with Tiers
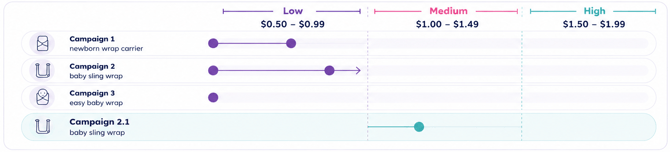
Once the campaigns are live, they’ll start in the Low tier. If a campaign still receives no impressions as the bid inches upward, you can move it to the next tier.
Let’s say your bid tiers look like this:
- Low: $0.50–$0.99
- Medium: $1.00–$1.49
- High: $1.50–$1.99
- Start all bids in the low tier.
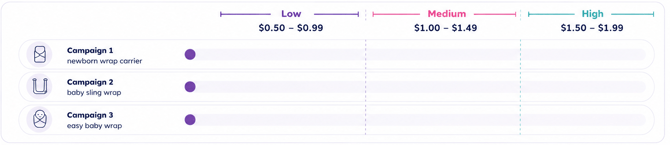
- Not getting traffic? Inch up your bids a few cents within that tier.
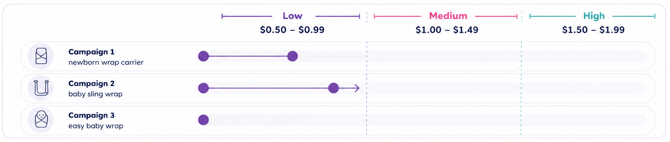
- Still no traffic? Duplicate the campaign and move to the medium tier. Inch up within that tier. Repeat until you begin getting traffic, but do not skip tiers.
Create Your Low-, Medium-, and High-Bid Rules
- From your Scale Insights account, navigate to Automation > Bidding rule.
- Select Create Rule.
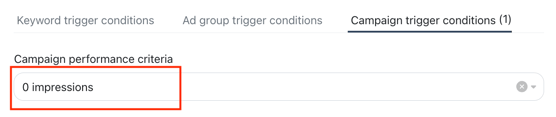
- Under Campaign trigger conditions, select the 0 impressions condition. This means the rule will be triggered if the campaign receives no impressions.
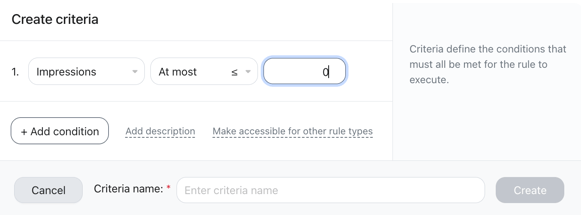
a. If it doesn’t exist, create a new criteria and set Impressions to at most 0.
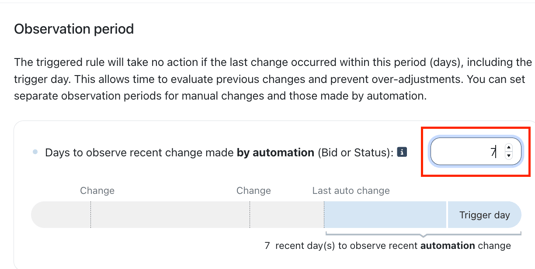
- Set the observation period to 7 days. This means the rule will wait 7 days between adjustments.
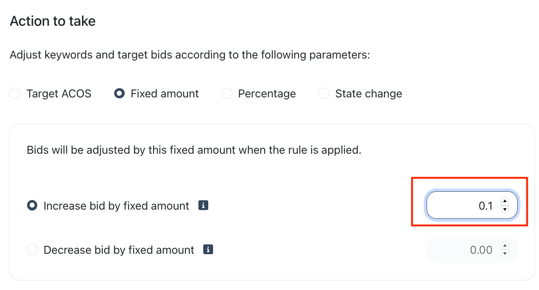
- In the Action to Take section, select Fixed amount and select Increase bid by fixed amount, e.g. $0.10
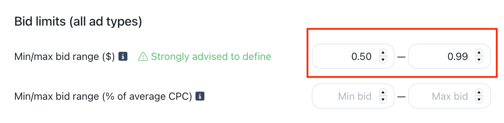
- In the Bid limits section, define the min/max bid range to $0.50 – $0.99 (your Low tier).
-
- This means the rule will increase bids by $0.10 and not exceed $0.99.
-
- Specify a name for your rule and click Create rule. E.g. Bidding rule for Low tier.

- Repeat steps 2 to 7 to create the Medium and High bid rules, with the bid limits $1.00–$1.49 and $1.50–$1.99 respectively.
Finding the lowest viable bid helps control what you pay for traffic. The next step is controlling when you’re willing to pay for it.
Control When You’re Willing to Pay
Dayparting lets you identify the hours where performance consistently strengthens or weakens, then adjust how aggressively your campaigns compete during those periods.
|
Stronger-performing hours Keep campaigns active or compete more aggressively during hours that historically convert well. |
Weaker-performing hours Reduce bids or pause campaigns during hours that consistently perform less efficiently. |
Create Your Dayparting Rule
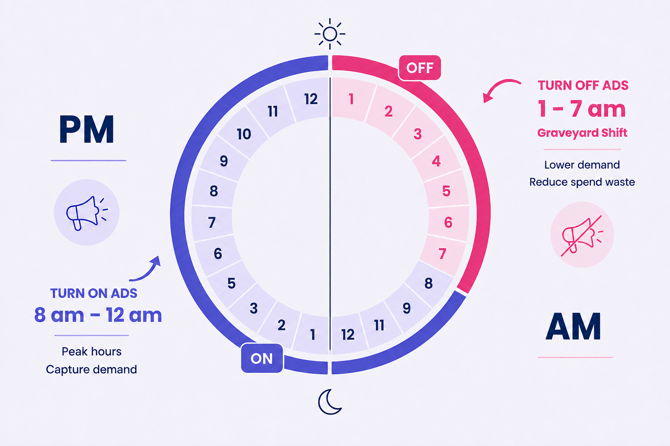
The example below shows how to disable ads every day during weaker-performing hours (1am to 7am).
- From your Scale Insights account, navigate to Automation > Dayparting Rule.
- Click Create rule.
- Select the 1am to 7am cells for Monday to Sunday.
- Click Disable.
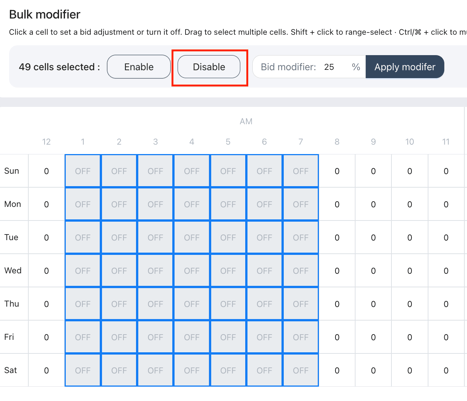
- Enter a rule name and click Create rule.

Don’t Keep Bidding Up Just to Chase More Sales
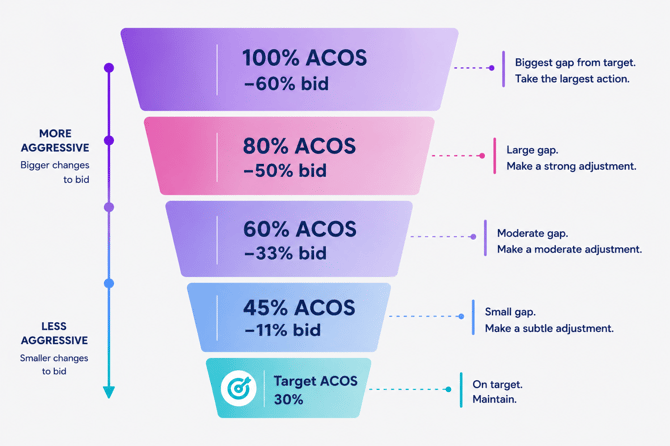
The idea is to reduce bids proportionally as ACOS moves further above target—the larger the gap, the more aggressive the reduction. Ivan also used an observation period after each adjustment, giving performance time to settle before another change was made.
|
Example:
|
Locate Your ACOS-Driven Bid Reduction Rules
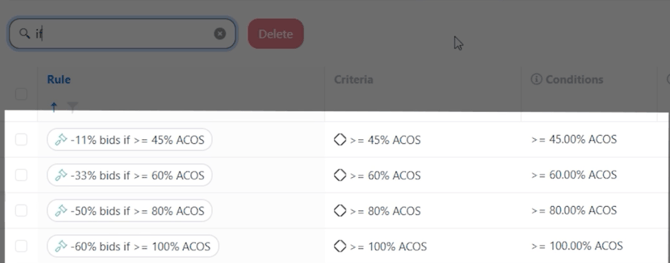
Scale Insights includes four preset rules that can automate these bid reductions, with an observation period between adjustments to help reduce the risk of over-correcting.
- From your Scale Insights account, navigate to Automation > Bidding Rule.
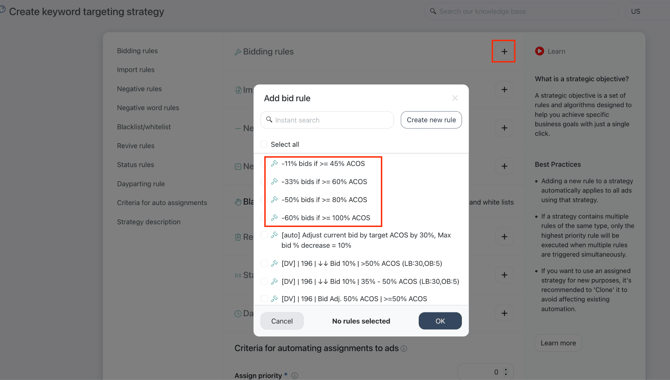
- Locate these four preset rules. You’ll add them to each Strategic Objective later:
- -11% bids if >= 45% ACOS
- -33% bids if >= 60% ACOS
- -50% bids if >= 80% ACOS
- -60% bids if >= 100% ACOS
- The bigger the ACOS gap, the more aggressive your bid adjustments. E.g. If your target ACOS is 30% and current ACOS is:
- 100% — Reduce bids by 60%
- 80% — Reduce bids by 50%
- 60% — Reduce by 33%
- 45% — Reduce by 11%
- Each preset rule has a default observation period of 7 days and a defined priority so Scale Insights automatically detects the most appropriate rule to use.
You should now have all the individual rules needed for the bidding system.
3. Group the Rules into Strategic Objectives
Create Your Strategic Objectives
- Navigate to Automation > Strategic Objectives > Keyword Targeting.
- Click Create Strategic Objective.
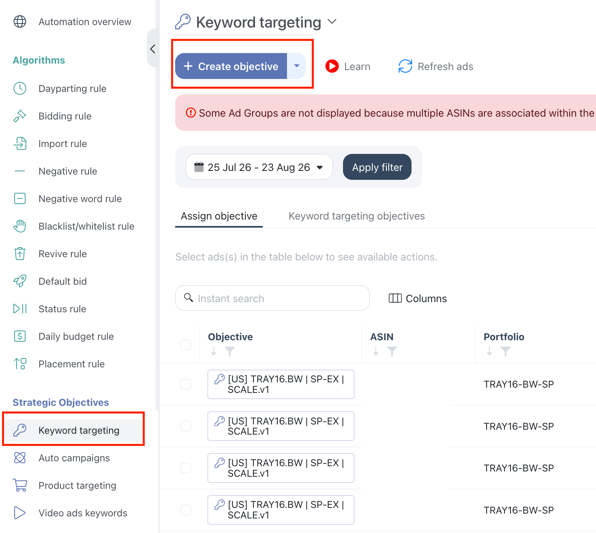
- Click on the + icon to add:
-
- Low-tier bidding rule you created in Part 2.
- Your Dayparting rule.
- The four ACOS-driven bid reduction rules.
-
- Give the Strategic Objective a clear name, such as AMC – Low Bid Tier and click Create strategy.
- Repeat for the Medium and High tiers, replacing only the tier-specific inch-up rule.
Important: Don’t assign the Strategic Objectives yet. You’ll apply them when you create the AMC campaigns in the next part.
4. Launch the AMC Campaigns at Scale
Apply AMC Audience Bid Boosts With Scale Insights
- Log in to your Scale Insights account.
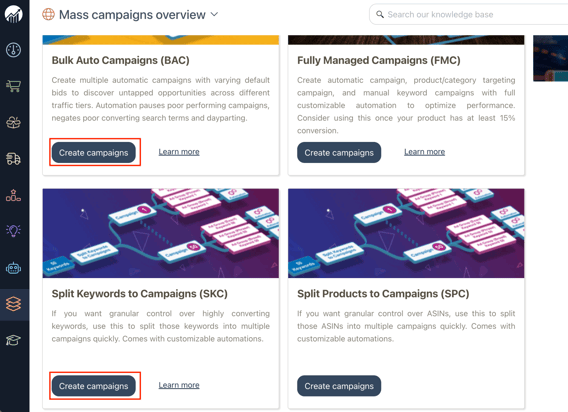
- Navigate to Mass Campaigns.
- Select Create campaigns for either BAC or SKC. In this example, we’ll create SKCs.
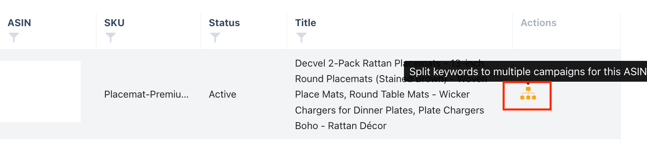
- Find the ASIN you want to use, then click the Split keywords to multiple campaigns icon.
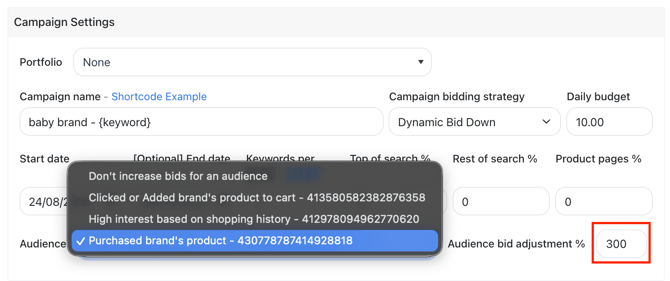
- Complete the standard campaign settings, including campaign name, bidding strategy, daily budget, and start date. For this workflow, the two AMC-specific settings are Audience and Audience bid adjustment %.
-
- In this example, we’re using a 300% audience modifier. This is not a recommended adjustment for every campaign.
-
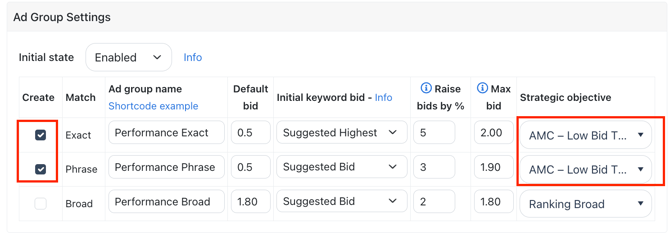
- Under Ad Group Settings, select the match type(s) for this bulk campaign and set the default bid(s) for this match type.
-
- E.g. Exact match has a $2 default bid, meaning your bid becomes $6 with the AMC audience boost.
- Select the Low-tier Strategic Objective you created in Part 3.
-
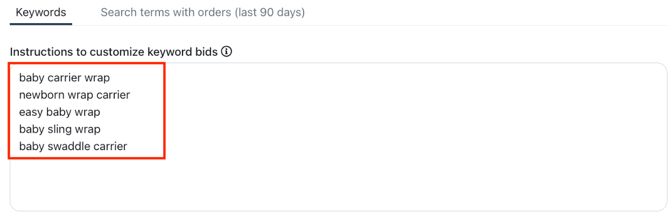
- Enter the keywords you want to target. Use the conversion opportunities you found in Part 1 above.
- Click Preview and confirm the ASIN, keywords, match types, base bids, AMC audience, audience adjustment, and number of campaigns being created.
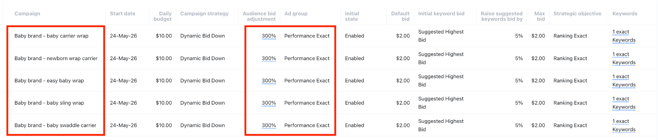
- If everything looks correct, click Execute and the AMC bid boost is automatically applied to these new campaigns.
When to Move to the Next Bid Tier
Start the new campaigns with the Low-tier Strategic Objective.
If a campaign reaches the Low-tier maximum bid and still receives no impressions, duplicate the campaign, start the duplicate at the bottom of the Medium tier, and assign the Medium-tier Strategic Objective.
If the same happens at the top of the Medium tier, repeat the process using the High-tier Strategic Objective.
Your AMC campaigns are now live with the bidding controls in place. The final step is making sure the budget intended for those campaigns isn’t consumed elsewhere.
5. Protect the Campaign Budget with Portfolios
When campaigns compete for the same pool of money, lower-priority spend can eat into the budget you intended for growth. Separating portfolios by objective helps keep growth budgets from being consumed by maintenance spend.
The exact groups will depend on your account. The principle is to stop campaigns with different jobs from competing blindly for the same budget.
Separating the money solves where the budget goes. The next problem is controlling how quickly it gets spent.
Amazon doesn’t offer recurring daily portfolio budgets. So Ivan created a workaround.
Set Up Daily Portfolio Budgets
Use a date-range budget cap set to a one-day window for each portfolio.
Using Amazon Tools
- Log in to your Amazon advertising account and go to Campaign Manager.
- From the left sidebar, click Portfolios.
- Create a portfolio and add all campaigns sharing the same objective (e.g. Hero ASINs – AMC campaigns), then click Modify portfolio.
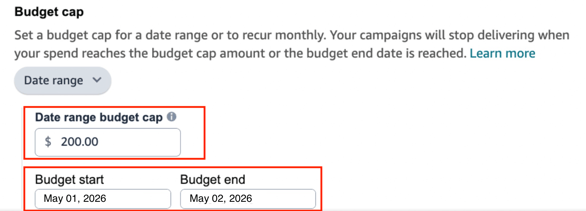
- Under the Budget cap section, select Date range.

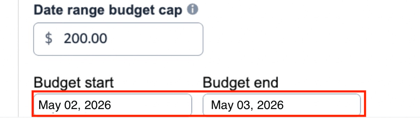
- Enter your daily budget cap — e.g. a $6,000 monthly budget ÷ 30 = $200/day. Set Start date to today and End date to tomorrow.
- At the end of each day, update the date range for the next day while keeping the intended daily cap.
- For example, at 11:55 PM on May 1:
- Budget cap: $200
- Start date: May 2
- End date: May 3
- Repeat this each day.
- For example, at 11:55 PM on May 1:
With Scale Insights
- Log in to your Scale Insights account.
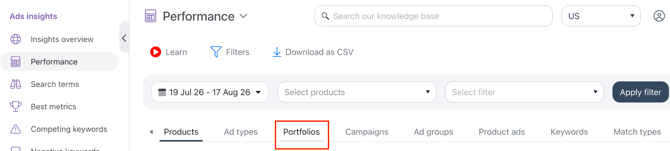
- Navigate to Ad Insights > Performance.
- Select the Portfolios tab.
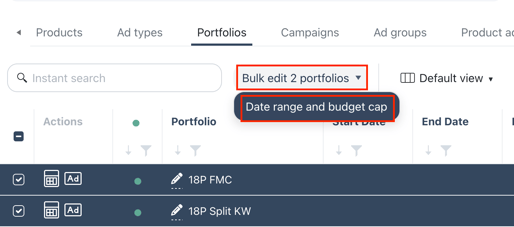
- Select the portfolio(s) to manage.
- Click Bulk edit portfolios > Date range and budget cap.
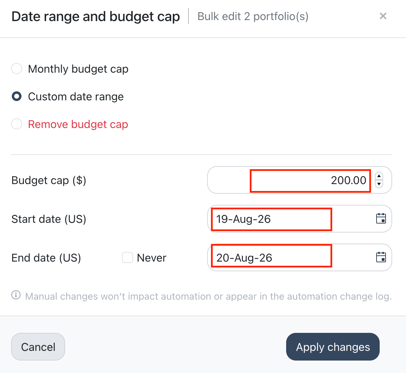
- Select Custom date range and enter your daily budget cap — e.g. a $6,000 monthly budget ÷ 30 = $200/day. Set Start date to today and End date to tomorrow.
- Click Apply changes.
- At the end of each day, update the date range for the next day while keeping the intended daily cap.
- For example, at 11:55 PM on May 1:
- Budget cap: $200
- Start date: May 2
- End date: May 3
- Click Apply changes.
- For example, at 11:55 PM on May 1:
|
Note: If you have different budgets across portfolios, you can manage this using Bulksheets. See Amazon documentation on using portfolios with bulksheets → |
Confirm Your Setup
Before you finish, confirm that you’ve:
- Identified a shortlist of keywords;
- Created Low-, Medium-, and High-tier bidding rules;
- Created the Dayparting rule and identified the four preset ACOS-reduction rules;
- Created three tier-specific Strategic Objectives;
- Launched AMC campaigns with the intended audience, base bid, and Strategic Objective;
- Grouped campaigns into the intended AMC portfolio;
- Applied the one-day portfolio budget cap correctly.